This is the first post in a 3 part series on load testing HAProxy, which is a reliable, high performant TCP/HTTP load balancer.
Load Testing? HAProxy? If all this seems greek to you, don’t worry. I will provide inline links to read up on everything I’m talking about in this blog post.
For reference, our current stack is:
- Instances hosted on Amazon EC2 (not that this one should matter)
- Ubuntu 14.04 (Trusty) for the OS
- Supervisor for process management
On production, we have around 30-odd HAProxy load balancers that help us route our traffic to the backend servers which are in an auto-scaling mode and hence don’t have a fixed number. The number of backend servers ranges from 12–32 throughout the day.
This article should help you get up-to-speed on the basics of load balancing and how it works with HAProxy. It will also explain what routing algorithms are available.
Coming back to our topic at hand, which is load testing HAProxy.
Never before did we put any dedicated effort into finding out the limits of our HAProxy setup in handling HTTP and HTTPS requests. Currently, on production, we have 4 core, 30 Gig instances of HAProxy machines.
As of writing this post, we’re in the process of moving our entire traffic (HTTP) to HTTPS (that is, encrypted traffic). But before moving further, we needed some definitive answers to the following questions:
- What is the impact as we shift our traffic from Non-SSL to SSL? ~ CPU should definitely take a hit because SSL handshake is not a normal 3-way handshake, it is rather a 5-way handshake and after the handshake is complete, further communication is encrypted using the secret key generated during the handshake and this is bound to take up CPU.
- What are some other hardware/software limits that might be reached on production as a result of SSL termination at the HAProxy level ~ We could also go for the SSL PassThrough option provided by HAProxy which terminates/decrypts the SSL connection at the backend servers. However, SSL termination at the HAProxy level is more performant and so this is what we intend to test.
- What is the best hardware required on production to support the kind of load that we see today ~ Will the existing hardware scale or do we need bigger machines? This was also one of the prime questions we wanted an answer to via this test.
For this purpose, we put in a dedicated effort for load testing HAProxy version 1.6 to find out answers to the above questions. I won’t be outlining the approach we took nor will I be outlining the results of this exercise in this blog post.
Rather, I will be discussing an important aspect of any load testing exercise that most of us tend to ignore.
The Ulimiter
If you have ever done any kind of load testing or hosted any server serving a lot of concurrent requests, you definitely would have run into the dreaded “Too many open files” issue.

An important part of any stress testing exercise is the ability of your load testing client to establish a lot of concurrent connections to your backend server or to the proxy like HAProxy in between.
A lot of times we end up being bottleneck on the client not being able to generate the amount of load we expect it to generate. The reason for this is not because the client is not performing optimally, but something else entirely on the hardware level.
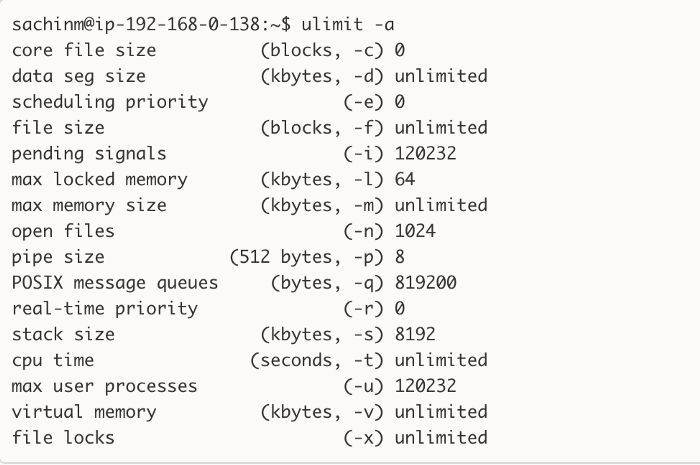
Ulimit is used to restrict the number of user-level resources. For all practical purposes pertaining to load testing environments, ulimit gives us the number of file descriptors that can be opened by a single process on the system. On most machines, if you check the limit on file descriptors, it comes out to be this number = 1024.

As you can see, the number of open files is 1024 on our staging setup. Opening a new TCP connection/socket also counts as an open file or a file descriptor and hence the limitation.
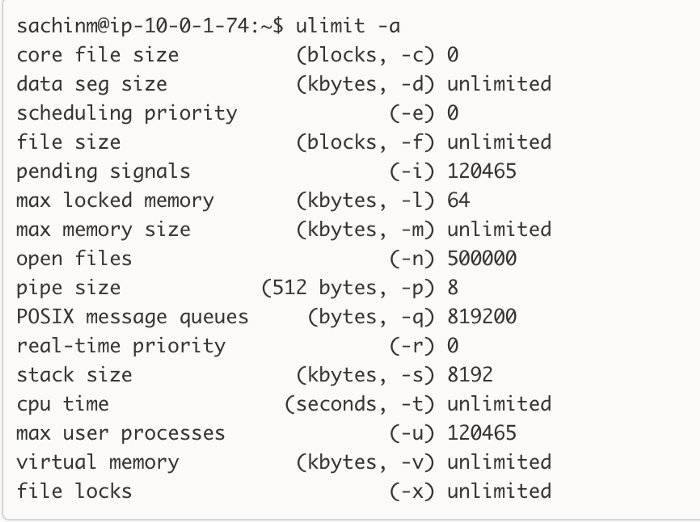
What this generally means is that a single client process can only open 1024 connections to the backend servers and no more. It means you need to increase this limit to a very high number on your load testing environment before proceeding further. Check out the ulimit setting we have on our production machines.

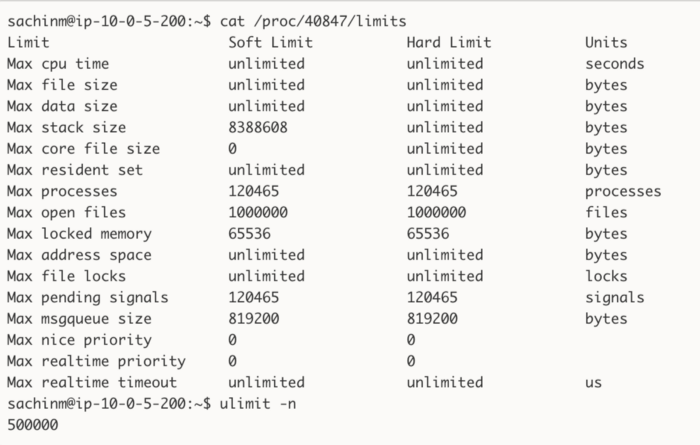
This information is what you would generally find after 10 seconds of Googling, but keep in mind that ulimit is not guaranteed to give you the limits your processes actually have! There are a million things that can modify the limits of a process after (or before) you initialized your shell. So what you should do instead is fire up top, [htop](http://hisham.hm/htop/), ps, or whatever you want to use to get the ID of the problematic process, and do a cat /proc/{process_id}/limits:

The max open files for this specific process are different than the system-wide limits we have on this server.
Let’s move on to the interesting part.
The Stuff You Came Here to Read: Raising the Limit
There are two ways of changing the ulimit setting on a machine.
ulimit -n <some_value>This will change the ulimit settings only for the current shell session. As soon as you open another shell session, you are back to square one i.e. 1024 file descriptors. So this is probably not what you want.fs.file-max = 500000Add this line to the end of the file/etc/sysctl.conf. Also, add the following:* soft nofile 500000* hard nofile 500000root soft nofile 500000root hard nofile 500000
to the file
/etc/security/limits.conf.
Note: The * basically represents that we are setting these values for all the users except root. “soft or hard” basically represent soft or hard limits. The next entry specifies the item for which we want to change the limit values i.e. nofile in this case which means the number of open files. And finally, we have the value we wanna set which in this case is 500000. The * here does not apply to a root user, hence the last two lines are specially for the root user.
After doing this, you need to take a reboot of the system. Sadly yes :( And the changes should reflect in the ulimit -n command.

Hurray!. Pat yourself on the back. You successfully changed the ulimit settings for the system. However, it is not necessary that changing this will affect all the user processes running on the system. It is quite possible that even after changing the system-wide ulimit, you might find that /etc/<pid>/limits give you a smaller number than what you might expect to find.

In this case, you almost certainly have a process manager or something similar that is messing up your limits. You need to keep in mind that processes inherit the limits of their parent processes. So if you have something like a Supervisor managing your processes, they will inherit the settings of the Supervisor daemon and this overrides any changes you make to the system level limits.
Supervisor has a config variable that sets the file descriptor limit of its main process. Apparently, this setting is in turn inherited by any and all processes it launches. To override the default setting, you can add the following line to /etc/supervisor/supervisord.conf, in the [supervisord]section:
minfds=500000
Updating this will lead to all the child processes being controlled by the supervisor inheriting this updated limit. You just need to restart the supervisor daemon to bring this change into effect.
Remember to do this on any machine that intends to have a lot of concurrent connections open. Be it the client in a load testing scenario or a server trying to serve a lot of concurrent requests.
In Part 2, we’ll learn how to deal with the sysctl port range monster.
Do let me know how this blog post helped you. Also, please recommend (❤) this post if you think this may be useful for someone.

Leave a comment